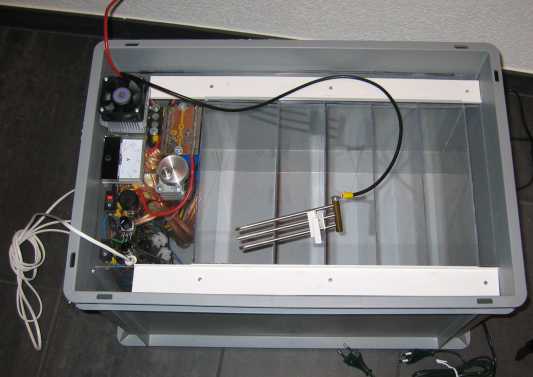
This page showes you the station with the pannel put in place.
Just like with the main frame, there is also no futher mounting for the pannel needed. The sides of the plastic box slighly press against the pannel and firmly hold it in place. There is also no mechanical force that could move it around or such.
The picture also show the fork I use to hold the PCB into the tanks. The fork is made so as it also forms the cathode during the electrolytic process. Also note the white little clamp which allows to very quickly adjust to the hight of the PCB.
| file: /Techref/pcb/plating/tps-pannel.htm, 1KB, , updated: 2009/10/23 12:33, local time: 2025/10/14 16:11,
216.73.216.114,10-3-244-150:LOG IN
|
| ©2025 These pages are served without commercial sponsorship. (No popup ads, etc...).Bandwidth abuse increases hosting cost forcing sponsorship or shutdown. This server aggressively defends against automated copying for any reason including offline viewing, duplication, etc... Please respect this requirement and DO NOT RIP THIS SITE. Questions? <A HREF="http://www.piclist.com/techref/pcb/plating/tps-pannel.htm"> Homebrew Through Hole PCB Plating Station - Pannel</A> |
| Did you find what you needed? |
|
o List host: MIT, Site host massmind.org, Top posters @none found - Page Editors: James Newton, David Cary, and YOU! * Roman Black of Black Robotics donates from sales of Linistep stepper controller kits. * Ashley Roll of Digital Nemesis donates from sales of RCL-1 RS232 to TTL converters. * Monthly Subscribers: Gregg Rew. on-going support is MOST appreciated! * Contributors: Richard Seriani, Sr. |
Welcome to www.piclist.com! |
.