Schematic making technique (1)
 To add a part to the schematic, click the "ADD" button which is put on the left side in the schematic window. By this operation, the following part addition window is displayed.
The name which is displayed in the Name column is the contents which are registered on the library. The part data which is made a green mark with the control panel is displayed.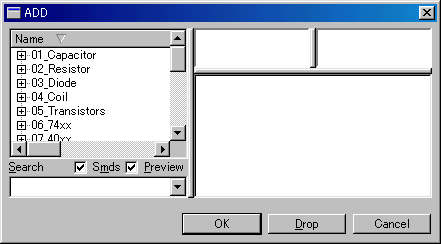  To stop the addition function of the part, it pushes an ESC key or it pushes the "Cancel" button in the schematic window. When the stop function is effective, the stop mark becomes red. 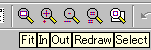 These buttons can do the magnification and the reduction of the schematic.
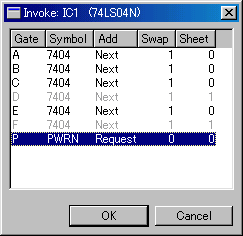
It is possible to do to be magnified and a reduction by the wheel operation of the mouse. It is magnified when turning a wheel over there and the reduction when turning forward. The center of being magnified or the reduction is the position of the mouse pointer.  The part which was drawn on the schematic can be deleted by the "Delete" button. The part which was drawn on the schematic can be deleted by the "Delete" button.After pushing the Delete button, it is deleted when clicking an unnecessary part.  When moving the part to have put on the schematic, the "Move" button is used. When moving the part to have put on the schematic, the "Move" button is used.The part moves with the mouse when clicking a part after pushing the Move button. The part is fix when clicking once again after moving to the position to want to put a part on. When you want to set the position of the part in detail, change a grid interval.  The IC needs wiring for power and ground. In the addition of the part by the Add button, it is possible to choose the element but it can not choose a power and a ground terminal. The IC needs wiring for power and ground. In the addition of the part by the Add button, it is possible to choose the element but it can not choose a power and a ground terminal.The "Invoke" button is used for the addition of the power and the ground terminal. When pushing the Invoke button and clicking an element on the schematic, the use situation of the device is displayed. This table is the list to add the element not to be using with the device. Because elements which are already put on the schematic, it isn't possible to select. P is a power and a ground terminal. When pushing the OK button, the power and the ground terminal appear on the schematic and it moves with the mouse. The position of this terminal is changed later. It's not need to overlap this terminal and the element. Even if it separates, it doesn't influence pattern creating.
 When changing the direction of the part, the "Rotate" button is used. After pushing the Rotate button, when clicking the part of the object, the part is made to turn by 90 degrees to the left direction. It turns by 90 degrees every time it clicks. When changing the direction of the part, the "Rotate" button is used. After pushing the Rotate button, when clicking the part of the object, the part is made to turn by 90 degrees to the left direction. It turns by 90 degrees every time it clicks.
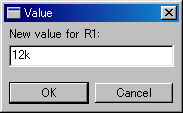
 The "Value" button is used to set the value of the part. It sets a value to the window to set a value and it pushes the OK button. A value is displayed at the part on the schematic. The "Value" button is used to set the value of the part. It sets a value to the window to set a value and it pushes the OK button. A value is displayed at the part on the schematic.
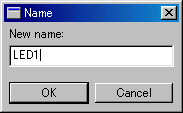
 The "Name" button is used to set the name of the part. It sets a name to the window and it pushes the OK button. A name is displayed at the part on the schematic. The "Name" button is used to set the name of the part. It sets a name to the window and it pushes the OK button. A name is displayed at the part on the schematic.
 When adding a part, a display position with name and value is fixed. There is possibility that the name or the value overlaps in the complicated circuit. In such a case, it is possible to make a name or a value move to the free position. The button to use for this purpose is the "Smash" button. After pushing the Smash button and starting up Smash feature, it clicks a name or a value. By this, the name and the value have a small + mark. The position with name and value can be moved by pushing the Rotate button or the Move button. When adding a part, a display position with name and value is fixed. There is possibility that the name or the value overlaps in the complicated circuit. In such a case, it is possible to make a name or a value move to the free position. The button to use for this purpose is the "Smash" button. After pushing the Smash button and starting up Smash feature, it clicks a name or a value. By this, the name and the value have a small + mark. The position with name and value can be moved by pushing the Rotate button or the Move button.
 When pushing the "Wire" button, it becomes a mode of the wiring by the Wire function and the wiring among the parts can be drawn. First, when left clicking the lead wire of the part, the starting point of the wiring is set. After that, it double-clicks a mouse at the point which ends wiring. It isn't necessary to keep to push the mouse button during wiring work. When pushing the "Wire" button, it becomes a mode of the wiring by the Wire function and the wiring among the parts can be drawn. First, when left clicking the lead wire of the part, the starting point of the wiring is set. After that, it double-clicks a mouse at the point which ends wiring. It isn't necessary to keep to push the mouse button during wiring work.For the details, refer to "Wiring using Wire function" of "Let's try".
 When confirming above-mentioned wiring name and so on, the "Info" button is used. The information is displayed when clicking a part or wiring after clicking the Info button.  A circular black mark is put to the node of the wiring. This mark doesn't have relation to the wiring of the printed board. It is to confirm the connection of the wire when the person sees a schematic. Especially, in case of the cross connection, it makes a mistake when not putting a mark. When pushing the Junction button, the circular mark which moves with the mouse pointer appears. Because the circle moves along the grid, it fits the node of the wiring. A mark is drawn to the schematic when left clicking at the node. 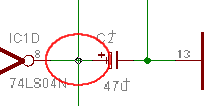  After drawing a schematic, it should be confirmed whether or not there is no mistake in the circuit connection. The mistake can be automatically detected by the ERC(Electrical Rule Check) button. The example of ERC
|