Circuit explanation of Decorative light Controller
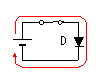 I will explain the operation principle of a thyristor first. A thyristor is a kind of a diode. The difference from a diode is having another terminal called Gate. Usually, current flows through a diode into a forward direction, and current does not flow into an opposite direction. A forward direction is in the condition which applied plus voltage to the anode and applied minus to cathode. Current flows into a diode in this condition. I will explain the operation principle of a thyristor first. A thyristor is a kind of a diode. The difference from a diode is having another terminal called Gate. Usually, current flows through a diode into a forward direction, and current does not flow into an opposite direction. A forward direction is in the condition which applied plus voltage to the anode and applied minus to cathode. Current flows into a diode in this condition.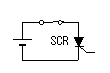 In case of a thyristor, current does not flow only by having applied plus to the anode and applying minus to cathode. If trigger current is given to a gate, current will begin to flow. Once current begins to flow, even if the trigger current of a gate will be lost, current continues flowing. This current continues flowing until it removes the voltage applying a thyristor. If current stops, a gate function will work again. Therefore, even if voltage is applied between an anode and cathode, current does not flow into a thyristor. In case of a thyristor, current does not flow only by having applied plus to the anode and applying minus to cathode. If trigger current is given to a gate, current will begin to flow. Once current begins to flow, even if the trigger current of a gate will be lost, current continues flowing. This current continues flowing until it removes the voltage applying a thyristor. If current stops, a gate function will work again. Therefore, even if voltage is applied between an anode and cathode, current does not flow into a thyristor.SCR is the abbreviation for Silicon Controlled Rectifier. 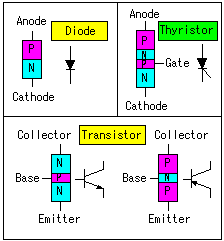 There are two kinds of semiconductors, P type semiconductor and N type semiconductor. P type semiconductor is a semiconductor with insufficient electrons and N type semiconductor is a semiconductor with electrons. The portion without an electron is called a hole with P type semiconductor and it has the electric charge of plus. This hole is not a substance. A hole is served like a substance with the electric charge of plus. There are two kinds of semiconductors, P type semiconductor and N type semiconductor. P type semiconductor is a semiconductor with insufficient electrons and N type semiconductor is a semiconductor with electrons. The portion without an electron is called a hole with P type semiconductor and it has the electric charge of plus. This hole is not a substance. A hole is served like a substance with the electric charge of plus.If these two kinds of semiconductors are combined, a semiconductor with various character will be made. A diode is made from the two-layer structure of P and N. This device has the character to pass current only one way. A transistor is made from the three-layer structure of P and N. It is the structure of PNP or NPN. This device has the character which amplifies current. In case of a thyristor, it has the structure of four layers of PNPN. This device has the same character as a diode fundamentally. However, the timing into which current begins to flow is controllable by a gate. 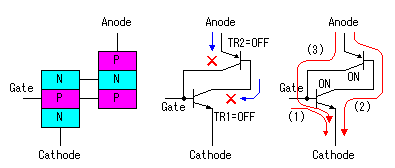 I will explain operation of a thyristor with transistors. Two transistors (TR1, TR2) which share two layers of the center of a thyristor are assumed. When current does not flow into a gate, TR1 will be in an OFF state and current will not flow into the collector of TR1. Therefore, current does not flow into the base of TR2, and TR2 is in the state of OFF. Even if voltage is applied over the anode of a thyristor in this state, current does not flow. Next, if current flows into a gate, current (1) flows into the base of TR1, and TR1 will be in ON state. Thereby, the base current (2) of TR2 flows through the collector of TR1. If base current flows into TR2, TR2 will be in ON state and current (3) will flow into the base of TR1 through the collector of TR2. Because current flows into the base of TR1 from TR2, even if the current of a gate is lost, current continues flowing into a thyristor. 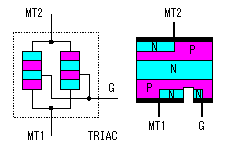 Bidirectional thyristor can be related to two SCRs connected in parallel in opposite directions. The timing into which a volts alternating current begins to flow is controllable by this device. Two independent thyristors are not combined in an actual device. P type semiconductor and N type semiconductor are together put with structure like the right of a left figure. Because I want control an alternating current by the equipment created this time, so I use bidirectional thyristor. A bidirectional thyristor is called TRIAC. 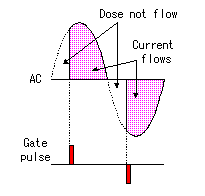 In a bidirectional thyristor, current begins to flow from the time of a pulse signal being given to a gate. That is, the quantity of the current which flows is changeable by changing the position of a gate pulse. (Reference) Fundamental Characteristics of Thyristors Thyristors & Triacs - Ten Golden Rules for Success In Your Application. 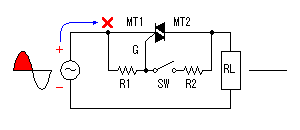 I will explain the operation of the circuit which used the bidirectional thyristor. Below, a bidirectional thyristor is called TRIAC. I will explain the operation of the circuit which used the bidirectional thyristor. Below, a bidirectional thyristor is called TRIAC.Even if a voltage is applied to the TRIAC, the current doesn't flow through the load (RL) until the current flows through gate (G). If a switch (SW) closes and current flows into the gate, MT1 and MT2 will be in an electrical connection state, and current will flow into load. If MT1 and MT2 will be in an electrical connection state, because the electrical connection resistance of the TRIAC is smaller than R2, current will hardly flow into the gate. Even if a switch opens, the electrical connection state of MT1 and MT2 is maintained, and current continues flowing into load. When the polarity of alternating voltage changes, the current which flows through MT1 and MT2 stops. Thereby, the TRIAC returns to an initial state. It works like the above when voltage of the opposite polarity be applied. Probably, you understand that the timing which closes a switch is important. Because a switch needs to operate to millisecond order, a mechanical switch cannot be used. It is necessary to use electronic parts. 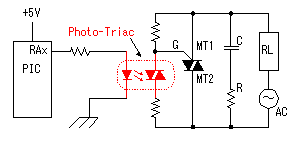 Photo-Triac is used for the part of a switch in this circuit. Photo-Triac is used for the part of a switch in this circuit.The reason for using Photo-Triac is for carrying out insulation of a circuit, separation of an alternating current circuit and a direct current circuit, and high-speed operation. The voltage to handle in main TRIAC is comparatively high voltage like 100VAC or 200VAC. However, because the voltage of a PIC circuit is 5VDC, it is necessary to separate both circuit. In the Photo-Triac (TLP560) used this time, the isolation voltage is 2500V. If LED is controlled by PIC which operates with 5VDC, it is possible to control the current of circuits, such as 100VAC, with TRIAC. Photo-Triac is the parts with which LED is included in the part of the gate of TRIAC. If light is put in LED to the portion of the base of a transistor like a photo transistor, the motion of the electrons and holes of N type and P type semiconductor will be activated. Thereby, the same effect as having passed current to the base. Therefore, if LED is turned on, Photo-Triac can be changed into an electrical connection state. If the Photo-Triac is in an electrical connection state, and if a gate current flows into the main TRIAC, it will be in an electrical connection state. Then, the voltage applied to Photo-Triac becomes almost 0V. Thereby, an electrical connection state is canceled. Therefore, current flows into the gate of the main TRIAC only through short time until the TRIAC itself will be in an electrical connection state. Even if the lighting time of LED is long, there is no problem. It effects only the first short time that Photo-Triac operates. The trigger current of the gate of the main TRIAC is controllable by lighting control of LED with the above operation. The capacitor (C) and resistor (R) which are connected in parallel with TRIAC are for abnormal-voltage prevention of load. In this circuit, from RA0 to RA4 are used as ports for TRIAC drive. Unlike other ports, RA4 does not have a drive power circuit. It is an open drain type. Only ON/OFF control of FET is performed. Therefore, a pull-up resistor is required for the exterior to making LED of Photo-Triac turn on. The Photo-Triac used this time is SM12J45 made by TOSHIBA. It is possible to handle upto 600VAC and 12A. So this equipment can be use with 240VAC. There is a zero voltage crossing turn.on type photo-triac. This is the type turned on from 0V, in order to stop a noise. Since it turns ON from the middle of alternating voltage wave form with this equipment, this type cannot be used. 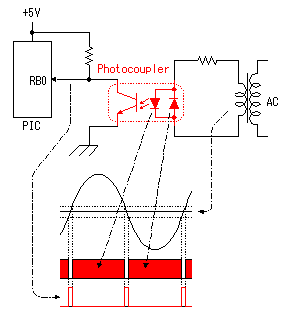 It is necessary to generate a gate pulse at time required in order to control TRIAC. A starting point is 0V of alternating voltage. It is necessary to detect 0V of alternating voltage. It is necessary to generate a gate pulse at time required in order to control TRIAC. A starting point is 0V of alternating voltage. It is necessary to detect 0V of alternating voltage.By this circuit, the voltage of 5V is inputted into RB0 terminal of PIC in the shape of a pulse when the polarity of alternating voltage changes. The reason for using a photo coupler is for insulation of a circuit, separation of AC/DC circuit, and high-speed operation like Photo-Triac. As a photo coupler, the photo coupler for AC/DC is used. LED is driven with alternating voltage and ON/OFF of a photo transistor is controlled by the light. LED makes polarity reverse and is connected in parallel. Therefore, even if the polarity of alternating voltage changes, one of LED lights up. When LED is ON, a photo transistor will be in ON state, and the voltage of RB0 terminal of PIC is set to almost 0V. Because voltage falls in the portion which changes the polarity of alternating voltage, there is time to turn on neither of the LED. Because the light to a photo coupler is lost at this time, a photo transistor will be in an OFF state and the voltage of RB0 terminal of PIC will be set to 5V. PIC16F series is equipped with the function to which interruption operation is carried out by the pulse inputted into RB0. In the left figure, the external pull-up resistor is drawn on RB0. In an actual circuit, the pull-up function built in PIC is used. The current which can be passed in the LED section of a photo coupler is about tens of mA at the maximum. Therefore, the high voltage for turning on LED cannot be used. In this time, 6VAC for making the power supply for PIC is used. Furthermore, current is controlled by the resistor. The pulse duration given to RB0 depends on the time which LED has switched off. It seems hundreds of microseconds. I measured the value of an actual circuit. In this circuit, it was about 250 microseconds. I decided the value of the resistor for current control of LED as follows. The peak voltage of AC6Vrms is 6V x 1.4 = 8.4V. When voltage is assumed to be 1.5V at the time of lighting of LED, the resistance for passing 20mA current is ( 8.4V - 1.5V ) / 0.02A = 345 ohms. I chose 330 ohms as a resistor. 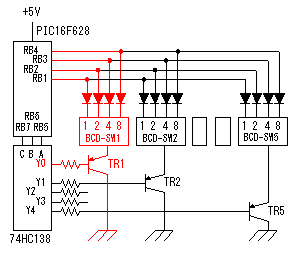 There are five AC control circuits in this equipment. It is possible to blink each circuit by the independent pattern. It is also possible to describe the blink pattern of each circuit by software. In this equipment, the pattern made beforehand can be chosen with BCD switch. There are five AC control circuits in this equipment. It is possible to blink each circuit by the independent pattern. It is also possible to describe the blink pattern of each circuit by software. In this equipment, the pattern made beforehand can be chosen with BCD switch.The state of a BCD switch is taken in with the scan by a decoder (74HC138). Only any one of the outputs (Y0-Y4) of a decoder is set to L level (0V) with the signal from PIC. Only any one of TR1 to TR5 will be in ON state by that, and the switch to read will be specified. Because the pull-up function of PIC is used, an external pull-up resistor is unnecessary in RB port. Although RB 5-6 is used as output port, a pull-up function does not influence these ports. The diode which is connected with the BCD switch is for the countercurrent prevention. With a BCD switch, an output terminal is connected inside by setup of a switch. For example, if the BCD switch 1 is set as 5, 1 and 4 of an output will be connected to a common (C) terminal. If there is no diode, this connection will influence the whole. As a result, a setup of a switch cannot be read correctly. 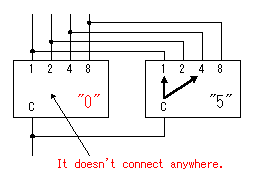 I mounted the BCD switches for changing a pattern on the control circuit board. Therefore, I need to open the case, when changing a pattern. It's troublesome. Then, I decided to attach a thumbwheel switch to the case. Thereby, a pattern is changeable even if it does not open the case. When a setup of a BCD switch is "0", a contact is not connected anywhere. Therefore, when connecting BCD switches in parallel, it is necessary to set up "0" except an active BCD switch. 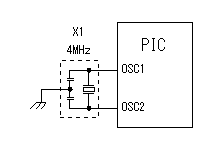 At the circuit this time, a 1 millisecond timer is used for the TRIAC drive. Moreover, processing is performed by brightness control to 100 milliseconds order. Although these processings are performed, it is not necessary to operate PIC at high speed. In order to operate PIC by a low speed, 4MHz is used as an oscillator. I recognized that PIC16F628 has a built in oscillator after the circuit design was ended. If precision oscillation frequency is not required, it doesn't need an oscillation element.  +5V is required as a power supply of ICs. Moreover, the alternating voltage for carrying out the time synchronization for controlling TRIAC is required. +5V is required as a power supply of ICs. Moreover, the alternating voltage for carrying out the time synchronization for controlling TRIAC is required.I used the small transformer with a center tap for conversion of alternating voltage. The transformer with a center tap was used without using a diode bridge in order to observe the wave of alternating voltage. I needed the grounded alternating voltage. If there is no necessity of carrying out wave observation, you can carry out full wave rectification with a diode bridge. In that case, a transformer without a center tap can be used. |