Circuit explanation of Display unit
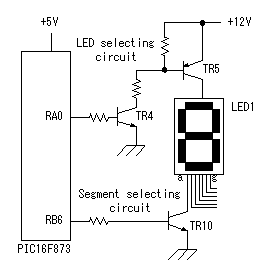 At the circuit this time, three 7 segment LEDs are used. Because, it is the I/O port number limitation with PIC and to make an electricity consumption little. Only the circuit which displays 100th is drawn in the schematic on the left. The circuit for 10th and 1st is similar too. At the circuit this time, three 7 segment LEDs are used. Because, it is the I/O port number limitation with PIC and to make an electricity consumption little. Only the circuit which displays 100th is drawn in the schematic on the left. The circuit for 10th and 1st is similar too.TR4 and TR5 are the circuit which selects a controlled LED. The drive voltage of the large-sized LED to be using this time is 12V. The drive voltage for one LED is about 2V. As for one segment, five LEDs are connected in series. So, the drive voltage of one segment becomes from 10V to 14V. The LED which was used this time is an anode common type and the anode terminal which applies + voltage is common to all the segments. Because an LED selecting circuit is put in the side of the + voltage, PNP type is used for the control transistor. When using NPN-type transistor for this circuit, the emitter of the transistor is connected with the anode terminal of the LED. In the case, the electric current control for the base becomes difficult. Therefore, I am using PNP type. TR4 is used for the output of PIC. This is because the voltage which is applied to the I/O port of PIC is limited to +5V. When making TR5 ON, it makes the base voltage of TR5 less than +12V.(About11V) The electric current flows through the base with this. When making TR5 OFF, it makes base voltage +12V. So, about +12V voltage is applied to the base of TR5. The base of TR5 can not be directly driven by PIC. When making RA0 of PIC 0V (0 conditions), TR4 becomes OFF. Therefore, the base electric current of TR5 doesn't flow and TR5 becomes OFF too. That is, LED1 doesn't light up. When making RA0 of PIC +5V (1 condition), the base electric current flows through TR4 and TR4 becomes ON. When TR4 becomes ON, the electric current flows through the base of TR5 and TR5 becomes ON condition. By this, +12V are applied on the anode of the LED and the LED becomes the condition about which it is possible to light up. The segment selecting circuit drives a lit segment. A segment selecting circuit is put between the LED and the grounding. So, the transistor for the control can be directly driven by PIC. In the left figure, a circuit for the "a" segment is drawn. The other segment control circuit is similar too. When making RB6 of PIC 0V (0 conditions), TR10 becomes OFF. Therefore, the electric current doesn't flow through the "a" segment of the LED and the "a" segment doesn't light up. The base electric current flows through TR10 when making RB6 of PIC +5V (1 condition). With this, the electric current flows through the "a" segment and the "a" segment lights up. 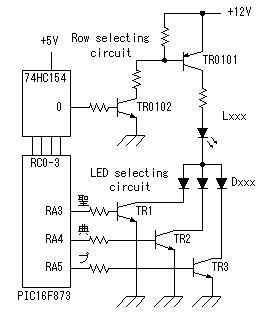 A circuit like 7 segments is used about the drive circuit for the category display. A category character is 1 character but is displayed by the LED matrix. An LED matrix is composed of 11 lines to the direction of the side(Row) and is composed of 13 lines to the longitudinal(Column). A lighting-up control is done every row. The row selecting circuit controls to pass an electric current to the LED of the row which was specified by PIC. Because there are 11 rows, the direct control by PIC is difficult. It is to limit the number of the I/O ports. A control signal is developed from the 4-bit signal of PIC to 11 signals by the decoder IC. The operation of the row selecting circuit is similar to the case of 7 segments. A circuit like 7 segments is used about the drive circuit for the category display. A category character is 1 character but is displayed by the LED matrix. An LED matrix is composed of 11 lines to the direction of the side(Row) and is composed of 13 lines to the longitudinal(Column). A lighting-up control is done every row. The row selecting circuit controls to pass an electric current to the LED of the row which was specified by PIC. Because there are 11 rows, the direct control by PIC is difficult. It is to limit the number of the I/O ports. A control signal is developed from the 4-bit signal of PIC to 11 signals by the decoder IC. The operation of the row selecting circuit is similar to the case of 7 segments.In case of above-mentioned 7 segment LED, each segment is composed of five LEDs. Therefore, the resistor for the electric current control is unnecessary. However, in case of category display, it is necessary to put a resistor for the electric current control every LED. The LED selecting circuit is the circuit which drives a lit LED in the selected row. The character to display with the circuit this time is three kinds. The kind of the character is controlled by RA3, RA4 and RA5 of PIC. The LED which is lit up every character is different. When seeing from the LED, there are one which lights up by all character, one which lights up only in case of specific character and so on. It is the diode of the LED selecting circuit that is controlling this. In case of the circuit of the figure on the left, the case of the LED which lights up by all character is shown. When making an LED light up only when TR1 is ON, it makes a diode only the one which is connected with the collector of TR1. It decides a displaying character pattern in the LED matrix and it decides the combination of these diodes every LED. 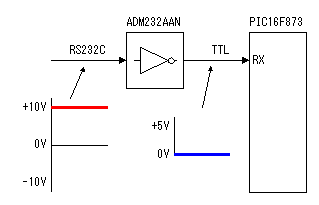 RS232C interface is used for the information transfer between the console unit and the display unit. RS232C interface is used for the information transfer between the console unit and the display unit.This interface is used for an interface with the modem. About ±9V is used for signal voltage on the connection cable with the console unit and the long distance transmission is possible comparatively. In the standard, the cable with about 15m length can be used. Actually, it is possible to use for any more distance. It depends on the condition of the cable. The +5V signal of PIC can be directly transmitted without using the RS232C interface if being a short distance. The purpose that this IC is used this time is to attempt to use the RS232C device and to secure a distance. In ADM232AAN of the ANALOG DEVICES Inc. which was used this time, it has the DC-DC converter which makes the voltage of ±10V with +5V power. So, the external circuit is very simple. This device receives the signal voltage (about ±9V) which is transmitted from the console unit and converts into TTL voltage (0V-5V). 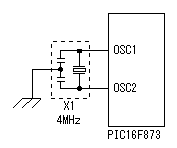 To make do the operation of PIC, a clock generator is needed. To make do the operation of PIC, a clock generator is needed.An oscillation circuit is had within PIC, so, it puts a vibrator outside only. As the vibrator, the crystal oscillator can be used because of the precision oscillation. However, at the circuit this time, a ceramic vibrator (Resonator) is used because it doesn't need the precision oscillation. The maximum clock frequency of PIC16F873 is upto 20MHz. However, at the equipment this time, because it doesn't need high-speed operation, the oscillation frequency is 4MHz. A transmission speed is calculated by 4MHz. So, when using this equipment at the clock frequency which is not 4MHz, reconsideration is needed. 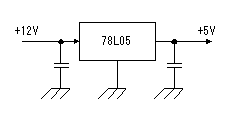 The power of the display unit is supplied from the console unit through the cable. The supplied voltage is +12V. This voltage can be used for the LED displaying just as it is, but the +5V change is necessary to the power for PIC. A 3 terminal regulator is used for the voltage change from +12V to +5V. +5V power is only used for PIC and decoder IC. So, it is enough for the 100 mA-type regulator. The power of the display unit is supplied from the console unit through the cable. The supplied voltage is +12V. This voltage can be used for the LED displaying just as it is, but the +5V change is necessary to the power for PIC. A 3 terminal regulator is used for the voltage change from +12V to +5V. +5V power is only used for PIC and decoder IC. So, it is enough for the 100 mA-type regulator. |