|
The way of debugging that I do is shown below.
 Preparation Preparation
I debugged by MPLAB. It's better to display the following windows on the screen beforehand.
 Listing file Listing file
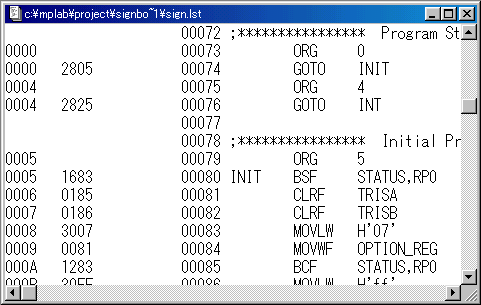
Window > Absolute Listing
SFR ( Special Function Register )
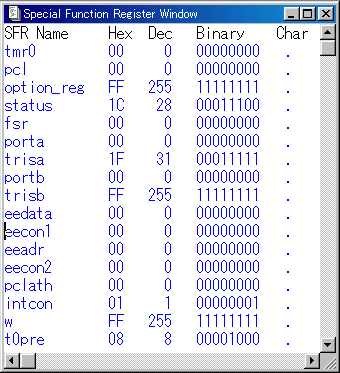
Window > Special Function Registers or 
File Registers
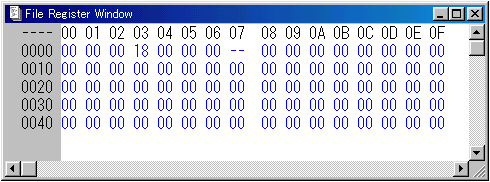
Window > File Registers or 
EEPROM Window
Window > EEPROM Memory
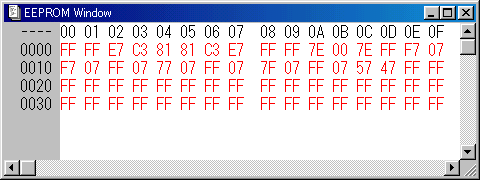
The data of the assembled result is displayed in the EEPROM window.
The data is specified with org h'2100' on source code.
Debugging of initialization process
The reset
Click the  button and it makes PIC a condition immediately after the turning on. button and it makes PIC a condition immediately after the turning on.
A dark bar is displayed on the line of PC=0000.
The debugging by the step operation
While clicking the  button, confirm operation. button, confirm operation.
| PC | Checkpoint |
| 0000 | : | It jumps to PC=0005. |
| 0005 | : |
Status Register of SFR is changed into 3Ch from 1Ch.
RP0 becomes '1' and the bank switches over to '1'. |
| 0006 | : |
It clears TRISA Register in 0.
All A ports are set as the output port by this. |
| 0007 | : |
It clears TRISB Register in 0.
All B ports are set as the output port by this. |
| 0008 | : | It sets data for the timer interrupt to W Register. |
| 0009 | : | OPTION_REG is changed into 07h from FFh. |
| 000A | : |
It changes a bank to '0'.
Status Register of SFR is changed into 1Ch from 3Ch. |
000B
000C | : | It sets interruption timer value (00h) to TMR0. |
000D
000E | : | It sets the timer interruption number of times. |
000F
0010
0011 | : |
EEPROM relation data is initialized.
Confirm the setting contents of each register.
e_adr(21h) = 00h (There is not a change because it is 00h originally)
e_check(22h) = 20h |
0012
0013 | : |
It makes a timer interrupt possible.
It makes GIE and the T0IE bit of INTCON Register '1'. |
The debugging of initialization processing ended above.
Debugging of LED screen process
After the initialization processing ends, the program counter becomes 0014h. Display control processing to the LED is executed from here.
The debugging by the step operation
While clicking the button, confirm operation.
| PC | Checkpoint |
| 0014 | : | It makes interruption possible. The GIE bit of INTCON Register becomes '1'. |
0015
0016
0017
0018 | : |
The initialization of the loop count value and the index value for the data reading is executed.
lpcnt(0Ch) = 10h
scrnidx(0Dh) = 0Fh |
| 0019 | : | It prohibits interruption processing. The GIE bit of INTCON Register becomes '0'. |
001A
001B | : | It makes an LED a going-out condition. 'FFh' is set to PORTB. |
001C
001D | : |
It outputs the row signal of the LED to PORTA.
At first, 0Fh is set to PORTA. |
| 001E | : | It sets address (10h) at the head of the data table to W Register. |
| 001F | : |
An addition with address at the head of the data table and index value is executed.
This result is the address of the data memory. |
| 0020 | : | It sets the contents of W Register(Data memory address) to FSR Register. |
| 0021 | : |
When setting an address to FSR Register, the content of the data memory is set to INDF Register.
It moves the content to W Register. |
| 0022 | : |
It outputs the content of the data memory to PORTB.
It doesn't find a change because the contents of PORTB Register are 00h originally.
It is possible to use Modify function as the way of confirming that this processing is normally executed.

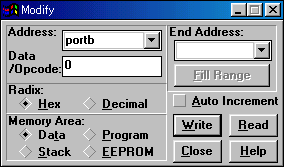
The Modify function
This function is the function to change the contents of memory.
The way of operating is hereinafter.
(1) When double-clicking the portb item of SFR Window, Modify Window is displayed.
This Window can be displayed by Window > Modify .
In the case, you choose portb at the item of Address.
(2) Type the value to set to Data/Opcode.
(3) Click the Write button. The value is set to PORTB by this operation.
(4) Click the Close button and close Modify window.
It is possible to confirm that the contents of PORTB change into 00h when executing the instruction of 001E after above operation. |
| 0023 | : |
It subtracts a table index.
The contents of address 0Dh is changed into 0Eh from 0Fh. |
0024
0025 | : |
It checks that the data table ends.
When the subtracted result is 00h, it is a table end.
In case of not being a table end, the execution of the program moves to 0025h and jumps to 001Ah.
Processing is executed while subtracting an index until the data table ends since then. |
| 0026 | : | The processing moves to this address when the table ends. |
The confirmation of LED screen processing operation ended above. This processing is always executed when timer interrupt processing isn't done.
Debugging of timer interrupt process
When a breakpoint is set at the head of the interruption processing, the interrupt operation can be confirmed.
The setting of a breakpoint
The breakpoint can be set by following procedure.
| (1) | Click the step to want to make stop processing and it moves a cursor. This time, it is 0027h. |
(2)
 |
Click the right button of the mouse.
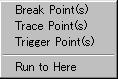
Choose Break Point(s) in the displayed menu and click the left button of the mouse.
The line which a breakpoint was set to changes to the red. |
A breakpoint was set by above operation.
To carry forward in the processing to the breakpoint, click the  button. It is possible to make this operation to be Debug > Run > Run. button. It is possible to make this operation to be Debug > Run > Run.
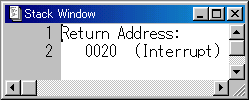
The return address confirmation of the interrupted program
It confirms that the return address of the interrupted program is written at the stack. To do always this confirmation is unnecessary.
The STACK window can be displayed by Window > Stack.
The debugging by the step operation
While clicking the button, confirm operation.
| PC | Checkpoint |
| 0027 | : |
It saves W Register.
The address to save is 0Eh of the RAM register file.
Confirm that the content of W Register is written in 0Eh. |
0028
0029 | : |
It saves the contents of STATUS Register.
Confirm that the content of STATUS Register is written in 0Fh. |
002A
002B
002C | : |
It checks a timer interrupt.
Generally, it jumps to 002Bh for timer processing. |
| 0032 | : |
It clears the flag of the timer interrupt.
Confirm that the T0IF bit of INTCON Register becomes 0. |
0033
0034 | : |
It sets a timer value.
Confirm that TMR0 becomes 00h. |
| 0035 | : |
It checks the number of times of the timer interrupt.
In the case below the setting number of times, it subtracts the number of times and PC is moved to the interruption ending processing. |
The debugging of interruption ending processing
Because it is the following of the setting number of times in the 1st interruption, it confirms interruption ending processing continuously. |
| 002D | : |
It reads the content of STATUS Register from the saving area.
Confirm that the content of memory address 0Fh is written in W Register. |
| 002E | : |
Confirm that the content of W Register is written in STATUS Register.
It is easy to confirm that it changes the contents of STATUS Register beforehand by the Modify function. |
| 002F | : |
SWAPF instruction is used to recover W Register.
Confirm that 4 bits at the top and the bottom of the content of the saving area is reversed.
EX. 0D -> D0 |
| 0030 | : | Confirm that an original value is written in W Register. |
| 0031 | : |
It returns to the interrupted processing from the interruption processing with the RETFIE instruction.
Confirm that '1' is set to the GIE bit of INTCON Register.
Also, confirm that program counter (PC) is moved to the interrupted program. |
Debugging of LED screen data change process
The change of the LED screen data is executed by the timer interrupt. First, a breakpoint is set at the head of the LED screen data change processing.
This time, the breakpoint is 0037h.
The debugging by the step operation
While clicking the button, confirm operation.
| PC | Checkpoint |
0037
0038 | : |
It sets the timer interrupt number.
Confirm that TM_CNT(20h) is changed from 00h to 0ch. |
0039
003A | : |
It sets the loop processing counter to move the lighting-up data of the LED.
Confirm that 0Fh is set to S_LOOP(23h). |
003B
003C | : |
It sets the head of the LED screen table as the reading index.
Confirm that 10h is set to S_INDEX(24h). |
| 003D | : |
It adds an index value.
Confirm that 11h is set to W Register. |
003E
003F | : |
It writes the index (the data address) to read in FSR Register.
Confirm that FSR became 11h. |
0040
0041 | : |
It saves read data in the work area.
Confirm that the content of INDF Register is written in S_WORK(25h).
Originally, because it is 00h, it isn't possible to do the confirmation of the change. It isn't possible to use Modify function for W Register. |
0042
0043 | : |
It sets a data writing address to FSR.
Confirm that it is changed to the value with FSR which is one few. |
| 0044 | : | It reads the content of S_WORK and sets it to INDF. |
| 0045 | : |
It adds an index.
Confirm that S_INDEX(24h) is added. |
| 0046 | : | It checks whether or not the data shifts for 15 ended. |
The setting of a breakpoint
Cancel all already set breakpoints and set a breakpoint to 0048h.
To carry forward in the processing to the breakpoint, click the button. It is possible to make this operation to be Debug > Run > Run.
The debugging by the step operation
While clicking the button, confirm operation.
| PC | Checkpoint |
0048
0049 | : |
It sets the address of the destination to write data to FSR Register.
Confirm that the last address (1Fh) of the LED screen table is set to FSR. |
004A
004B | : |
It sets the reading address of the EEPROM to EEADR register.
In the initialized condition, 00h of addresses at the head of the EEPROM is set.
The Modify function can be used to confirm that EEADR changes. |
| 004C | : |
EECON1 to indicate the reading of the EEPROM Register is Bank1.
Confirm that the RP0 bit of STATUS Register becomes '1'. |
| 004D | : | It makes the RD bit of EECON1 Rgister '1' and it does a reading instruction. |
| 004E | : |
It returns a bank to 0.
Confirm that RP0 bit of STATUS Register becomes '0'. |
004F
0050 | : |
The read content of EEPROM is stored in EEDATA Register.
It copies this on to W Register and writes it in INDF Register.
Confirm that the content of the last of the LED screen table is changed to the content which was read from the EEPROM. |
| 0051 | : |
It updates the reading address of the EEPROM.
Confirm that E_ADR(21h) is added. |
0052
0053 | : |
It checks whether or not the data which was written in the EEPROM is the last.
In case of not being the last, 0053h is executed and move to the ending processing of interruption processing. |
The confirmation of the basic operation of the LED screen table was done above.
It confirms whether or not the LED screen table changes every interruption period before checking EEPROM data in the ending.
The setting of a breakpoint
Cancel all already set breakpoints and set a breakpoint to 0052h.
Confirm that the contents change into the side of 10h from the side of 1Fh every time when the button is clicked.
10 11 12 13 14 15 16 17  18 19 1A 1B 1C 1D 1E 1F
00 00 00 00 00 00 00 00  00 00 00 00 00 00 00 00
00 00 00 00 00 00 00 00  00 00 00 00 00 00 00 FF
00 00 00 00 00 00 00 00  00 00 00 00 00 00 FF FF
00 00 00 00 00 00 00 00  00 00 00 00 00 FF FF E7
00 00 00 00 00 00 00 00  00 00 00 00 FF FF E7 C3
00 00 00 00 00 00 00 00  00 00 00 FF FF E7 C3 81
00 00 00 00 00 00 00 00  00 00 FF FF E7 C3 81 81
00 00 00 00 00 00 00 00  00 FF FF E7 C3 81 81 C3
00 00 00 00 00 00 00 00  FF FF E7 C3 81 81 C3 E7
00 00 00 00 00 00 00 FF  FF E7 C3 81 81 C3 E7 FF
00 00 00 00 00 00 FF FF  E7 C3 81 81 C3 E7 FF FF
00 00 00 00 00 FF FF E7  C3 81 81 C3 E7 FF FF 7E
00 00 00 00 FF FF E7 C3  81 81 C3 E7 FF FF 7E 00
00 00 00 FF FF E7 C3 81  81 C3 E7 FF FF 7E 00 7E
00 00 FF FF E7 C3 81 81  C3 E7 FF FF 7E 00 7E FF
00 FF FF E7 C3 81 81 C3  E7 FF FF 7E 00 7E FF F7
FF FF E7 C3 81 81 C3 E7  FF FF 7E 00 7E FF F7 07
FF E7 C3 81 81 C3 E7 FF FF 7E 00 7E FF F7 07 F7 |
It confirms the operation when the data of the EEPROM becomes end.
The setting of a breakpoint
Cancel all already set breakpoints and set a breakpoint to 0054h.
To carry forward in the processing to the breakpoint, click the button. It is possible to make this operation to be Debug > Run > Run.
When there are much data which are written in the EEPROM, it takes time little until it reaches a breakpoint.
The debugging by the step operation
While clicking the button, confirm operation.
| PC | Checkpoint |
| 0054 | : |
It initializes the reading address of the EEPROM.
Confirm that E_ADR(21h) is cleared in 0. |
0055
0056 | : |
It initializes the checking counter to confirm the end of the EEPROM.
Confirm that a data size is set to E_CHECK(22h). |
| 0057 | : | It jumps to the interruption ending processing. |
The debugging is ended above.
|